Introduction
presentation: https://rust-augsburg.github.io/rust-pico-training/
repo: https://github.com/rust-augsburg/rust-pico-training
Tiago Manczak https://github.com/tiagomanczak
Michael Schury https://github.com/datenzauberer
Rust Meetup Augsburg
Why Rust and Embedded Rust in particular?
Security, Memory Safety
- Ownership, Borrowing, Lifetimes
Avoidance of runtime errors
- Compile-time checks
Zero-cost abstractions
Uniform ecosystem
- Cargo as package manager
- Dependency management
- Test Framework
- Documentation creation
- Platform-independent development
- Cross-compilation
Why Pico
https://www.raspberrypi.com/documentation/microcontrollers/raspberry-pi-pico.html#the-family
Decision for Pico Family
- Price-performance ratio: many peripherals at a favorable price
- Professional development environment
- Comprehensive documentation
Easy Startup with Pico
Wi-Fi with Pico W
Setup development environemt
The following setup description assumes you are using Ubuntu 22.04 LTS.
Ubuntu 22.04 setup
Please ensure your Ubuntu 22.04 installation is set up as described below.
sudo apt update
sudo apt install -y git
# curl needed for installing rust
sudo apt install -y curl
# libudev-dev needed for debugging
sudo apt install -y libudev-dev

# for cargo generate:
sudo apt install -y build-essential
sudo apt install -y pkg-config libssl-dev
Visual Studio Code (VSCode)
Download VS Code from the official website: https://code.visualstudio.com/download
Install VScode, e.g.:
sudo apt install ~/Downloads/code_1.87.2-1709912201_amd64.deb
Install the extensions (from the command line):
# rust development
code --install-extension rust-lang.rust-analyzer
# debug rust code
code --install-extension vadimcn.vscode-lldb # on macOS/Linux
#code --install-extension ms-vscode.cpptools # on Windows
# for Debugging with probe-rs:
code --install-extension probe-rs.probe-rs-debugger
Start VS Code:
- Launch VS Code from the terminal using
codeor through your applications menu.
Install Rust
Follow the official Rust installation instructions to install Rust, including the compiler (rustc) and package manager (cargo): https://www.rust-lang.org/tools/install
Execute the following installation command and do a "1 Standard installation".
curl --proto '=https' --tlsv1.2 -sSf https://sh.rustup.rs | sh
Restart your shell or source your environment variables as instructed in the terminal output (e.g., for bash: source $HOME/.cargo/env).
Verify Rust Installation
Verify Rust compiler installation
rustc --version
This command should return the version of the Rust compiler, rustc, that's currently installed on your system. For example, it might output something like rustc 1.77.1 (7cf61ebde 2024-03-27), indicating the version number and the release date.
Verify Cargo installation
Cargo is Rust's package manager and build system. To check if Cargo is installed correctly and view its version, type:
cargo --version
This should return the version of Cargo installed on your system, similar to the Rust compiler version check.
Embedded Rust Development Dependencies
Follow the installation instructions here rp-rs/rp-hal Getting Started to get ready:
rustup self update
rustup update stable
rustup target add thumbv6m-none-eabi
cargo install elf2uf2-rs --locked
cargo install probe-rs --features cli --locked
cargo install flip-link
If the installation fails due to missing dependencies, install the required packages as described in Ubuntu 22.04 setup
ATTENTION: Update the /etc/udev/rules.d (as described in Probe.rs documentation:
curl -o ~/Downloads/69-probe-rs.rules https://probe.rs/files/69-probe-rs.rules
sudo cp ~/Downloads/69-probe-rs.rules /etc/udev/rules.d
sudo udevadm control --reload
sudo udevadm trigger
cargo-generate
Install cargo-generate (to create your own projects):
cargo install cargo-generate
If the installation fails due to missing dependencies, install the required packages as described in Ubuntu 22.04 setup
Run blinky example
Clone the repo
git clone https://github.com/rust-augsburg/blinky
cd blinky
Setup Pico in BOOTSEL mode
To keep the setup minimal we via flash our pico via UF2 (USB Flashing Format). Therefore you have to put your Pico in BOOTSEL mode:
-
Locate the BOOTSEL button: This small rectangular button is usually positioned near the micro USB port on your Pico board.
-
Hold the BOOTSEL button: Press and hold the BOOTSEL button firmly.
-
Connect the Micro USB cable: While still holding the BOOTSEL button, connect the other end of the micro USB cable to your computer.
-
Release the BOOTSEL button: Once the computer recognizes the Pico, you can release the BOOTSEL button.
Run
cargo run
Embedded Basics
- Board vs. Microcontroller
- Board: Pico WH, Pico W, Pico H
- Microcontroller:
RP2040
- Cross-Compilation
- Debug Probe
Pico Boards
Microcontroller: RP2040
RPRaspberry2number of cores0Type of core M0+4SRAM: 264KB SRAMfloor(log2(ram / 16k))0onboard volatile storage
W-Model: Infineon CYW43439
- Integrated Wi-Fi: 802.11 b/g/n
- Bluetooth: BLE Support
Important Links:
- rp2040-datasheet.pdf
- getting-started-with-pico.pdf
- https://datasheets.raspberrypi.com
- https://www.raspberrypi.com/documentation/microcontrollers
Breadboard Wiring Test Hardware
Stückliste
- Pico W (als Debug Probe)
- Pico W (als Target)
- LED
- Taster
- Widerstand 670 Ohm
- Potentiometer 470 KOhm
- Female-Female-cable (zur Verbindung mit Debug Probe: 3 DebugPins)
- Female-Male-cable (zur Verbindung mit Debug Probe: UART und Power)
Steckbrettaufbau
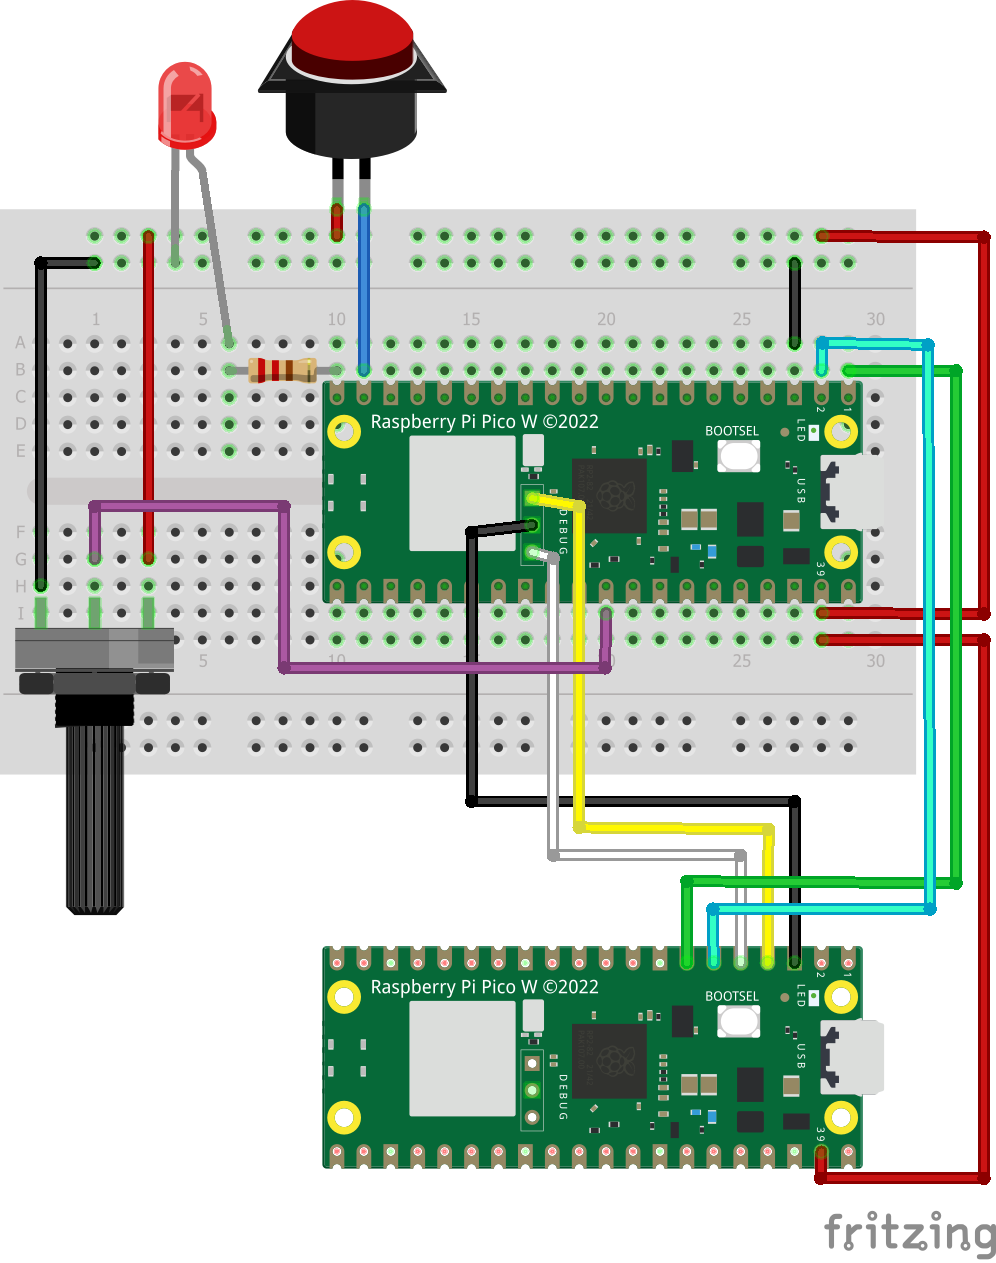
Belegte PINs von Target Pico:
GP14 Taster
GP15 LED
GP26 / ADC0 Potentiometer
Schaltplan
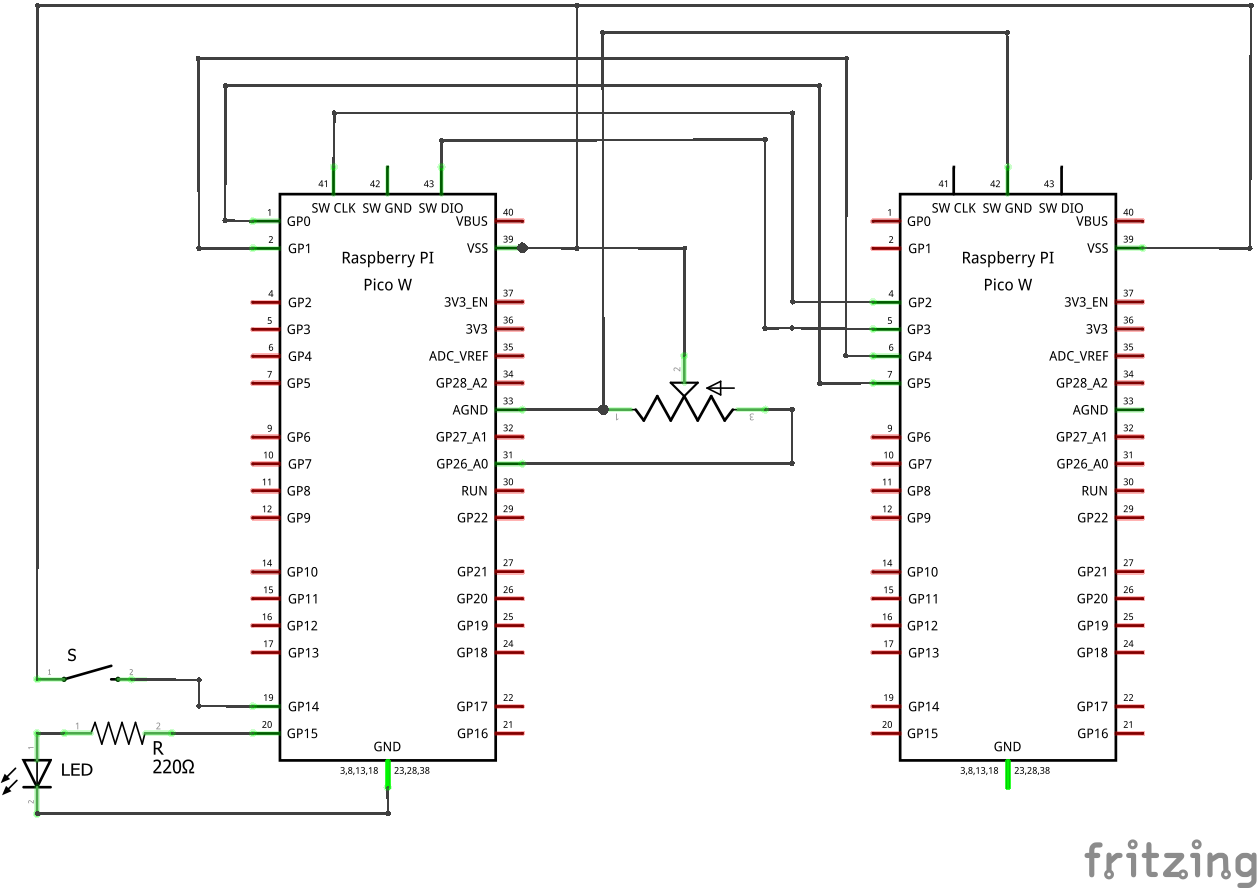
Steckbrettverdrahtung
Für DebugPico sind die Pins entsprechend der Nummerierung auf dem Pico-Board angeordnet. Für die linke und rechte Seite des Steckbretts folgt die Pin-Nummerierung der jeweiligen Steckbrettnummerierung
Steckbrett Linke Seite
| Quelle | Ziel |
|---|---|
| + | Rechts 2 |
| 1 | DebugPico 7 |
| 2 | DebugPico 6 |
| 3 | - (left) |
| 19 | Button 1 |
| + | Button 2 |
| 20 | Widerstand 1 |
| 25 | Widerstand 2 |
| 25 | LED Anode |
| - | LED Kathode |
Steckbrett Rechte Seite
| Quelle | Ziel |
|---|---|
| 2 | DebugPico 39 |
| 2 | + (links) |
| 26 | + (links) |
| 28 | 10 |
| 30 | - (links) |
| 26 | Potentiometer 1 |
| 28 | Potentiometer 2 |
| 30 | Potentiometer 3 |
DebugPins
Die Pins auf dem Debug Probe sind von links aufsteigend nummeriert (USB Stecker zeigt nach oben).
| Quelle | Ziel |
|---|---|
| 1 | DebugPico 4 |
| 2 | DebugPico 3 |
| 3 | DebugPico 5 |
Bild Steckbrettaufbau
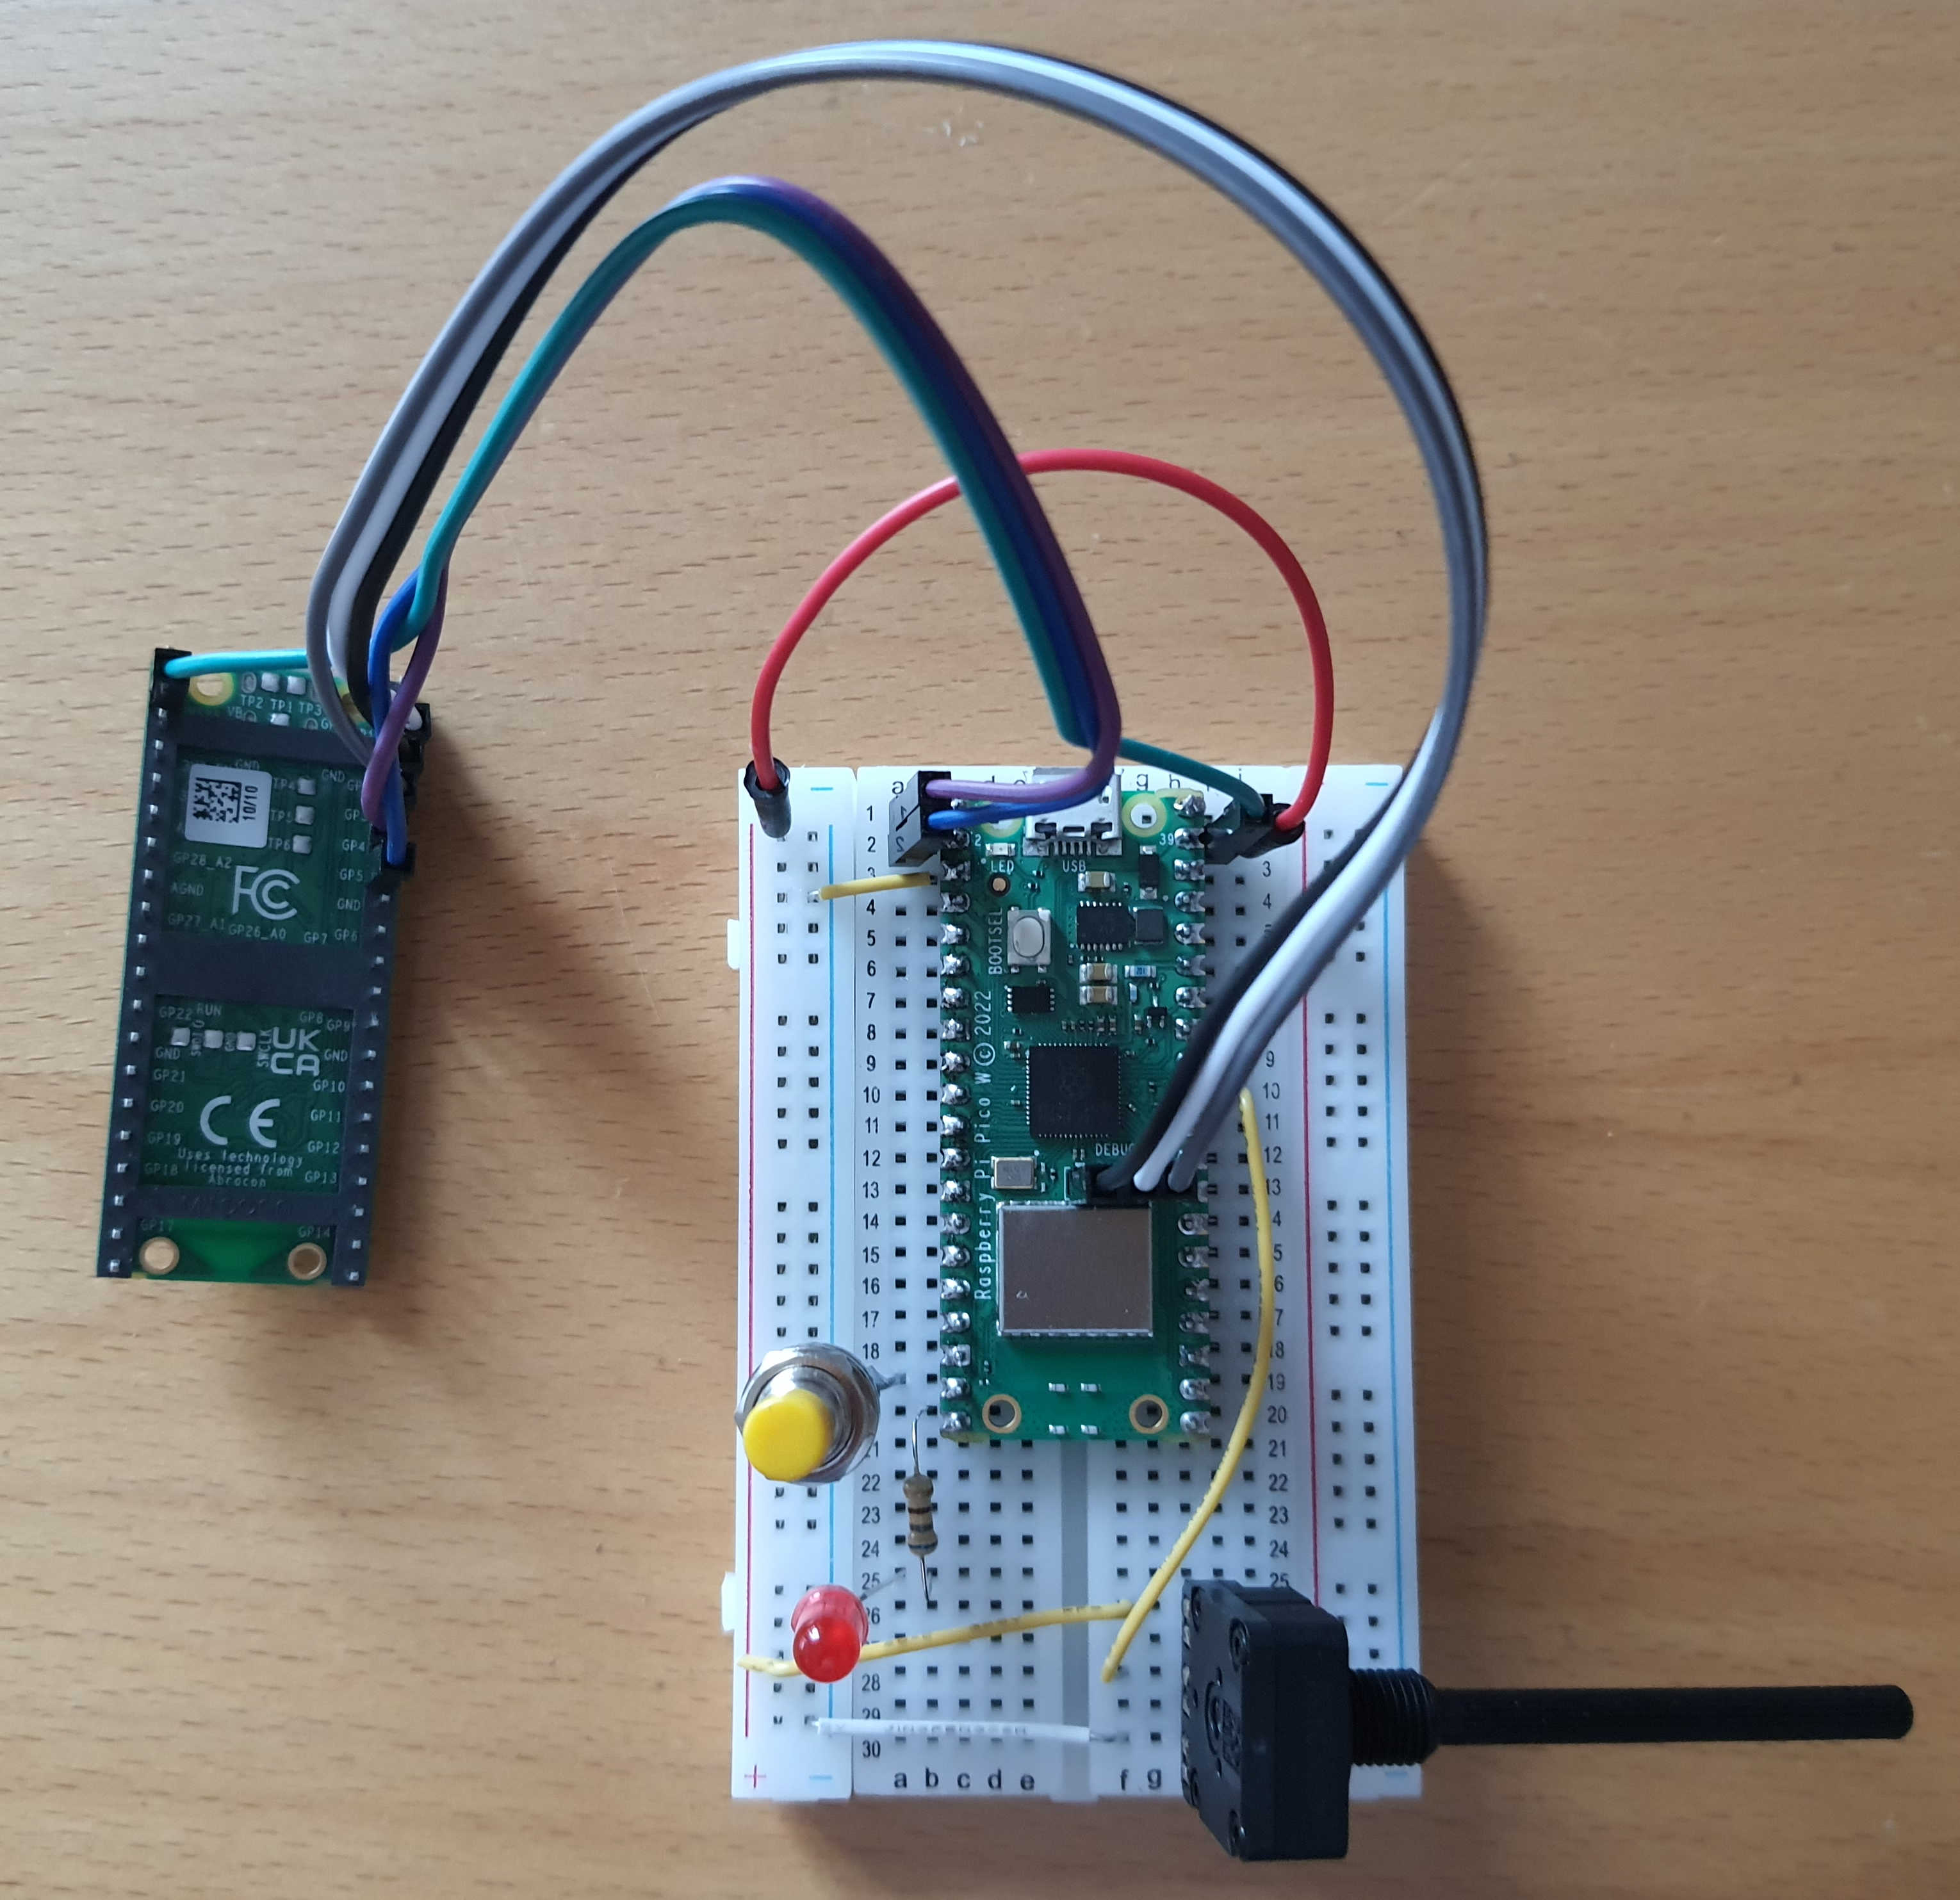
Picoprobe setup
Two Raspberry Pi Picos are used. PicoA operates as a debug probe, while PicoB serves as the production probe (the target hosting your code).
Flash debug probe (PicoA)
Download the firmware debugprobe_on_pico.uf2 from:
https://github.com/raspberrypi/debugprobe/releases
ATTENTION: debugprobe_on_pico.uf2 is needed !!
(Alternatively build the debugprobe from source code as described in Getting started with Pico Build and flash picoprobe)
Boot the Raspberry Pi PicoA with the BOOTSEL button pressed and copy the firmware, e.g.
sudo cp ~/Downloads/debugprobe_on_pico.uf2 /media/michael/RPI-RP2
Picoprobe Wiring
Debug Wiring (SWD and UART bridge)
| PicoA | PicoB | ||
|---|---|---|---|
| Pin | Description | Pin | Description |
| 38 | GND | Debug2 | GND |
| 4 | GP2 | Debug1 | SWCLK |
| 5 | GP3 | Debug3 | SWDIO |
| 6 | GP4/UART1 TX | 2 | GP1/UART0 RX |
| 7 | GP5/UART1 RX | 1 | GP1/UART0 TX |
Note: DebugPins are numbered from left to right when the USB connector is facing up.
Power Supply (Optional)
One advantage of using a Pico as a debug probe is that no separate power supply for the PicoB is needed:
| PicoA | PicoB | ||
|---|---|---|---|
| Pin | Description | Pin | Description |
| 39 | VSYS | 39 | VSYS |
Of course It's also possible to provide the power the PicoB via USB.
Testing Picoprobe
Test with flashing a simple application.
Rust Basics
fn main() {
    // Immutable Variable mit expliziter Typangabe
    let _logical: bool = true; // Variablen sind standardmäßig immutable

    // Mutable Variable - nur mutable Variablen können geändert werden
    let mut mutable: i32 = 12; // Mutable `i32`

    // Call by Reference: Übergeben der Variable `mutable` an eine Funktion
    modify_value(&mut mutable); // die Funktion benötigt einen mutable reference, um den Wert zu ändern

    // Ausgabe des veränderten Wertes
    println!("Modified value: {}", mutable);

    show_value(&mutable);
    //demo_for_loop();
}

// Funktion, die einen mutable reference auf eine i32 annimmt und den Wert ändert
fn modify_value(value: &mut i32) {
    *value += 9; // Dereferenzierung und Änderung des Wertes
}

// Funktion, die einen reference verarbeitet
fn show_value(value: &i32) {
    // Ausgabe des referenzieren Wertes
    // Dereferenzierungsoperator * ist nicht notwendig
    println!("Show value: {}", *value);
}

fn demo_for_loop() {
    for i in 0..3 {
        println!("Simple delay with for_loop: {i}");
    }
}
Obiger Code nutzt https://play.rust-lang.org/ zum Ausführen.
Links
Rust by Example zum Nachschlagen
Rust Book zum Lernen
Rustlings zum Üben
Rust Embedded
Challenges
no_std-Environment- Cross-Compilation
- Debugging
- Logging
Possibilities in Rust
rp-pico- easy to learn
- collection of crates
embassy- async-based
- steeper learning curve
- support for Wi-Fi and internal LED (on Pico W board)
Rust Embedded Architecture

Important Links:
-
rp-pico: (in Github)
- https://crates.io/crates/rp-pico includes links to examples
- ist in https://github.com/rp-rs/rp-hal-boards
-
rp2040-hal:
-
embedded-hal:
-
https://github.com/rust-embedded/embedded-hal
- "Important info:
embedded-hal v1.0is now released!"
- "Important info:
-
https://blog.rust-embedded.org/embedded-hal-v1/ Focus on drivers
We've removed traits that were found to not be usable for generic drivers (most notably timers).
details: migrating-from-0.2-to-1.0
-
Embedded Project Structure
.
├── build.rs
├── .cargo
│   └── config.toml
|── Cargo.toml
├── Embed.toml
├── memory.x
├── README.md
├── src
│   └── main.rs
└── .vscode
    └── settings.json
.cargo/configspecifies runner, build targetEmbed.tomlconfiguresprobe-rs,gdb,rttmemory.xdescribes where the RAM and FLASH are and their sizesbuild.rsensuresmemory.xis in out directory.vscode/settings.jsonconfigures debugger
Pico Examples
git clone https://github.com/rust-augsburg/rust-pico-examples
cd rust-pico.examples
cat README.md
Projekterstellung
Wir legen ein Musterprojekt namens rust-pico-linuxtag an, starten es und debuggen es ein bisschen.
Testaufbau und Debugging
Projekt anlegen via shell:
Nutze den folgenden Befehl in der Shell, um das Projekt zu erstellen:
cargo generate https://github.com/datenzauberer/rp2040-project-template
# offizielles project-template verwendet embedded-hal v0.2 (statt 1.0)
# cargo generate https://github.com/rp-rs/rp2040-project-template
Wähle rust-pico-linuxtag als Projektnamen und probe-rs für das Flashen. Der Output sollte etwa so aussehen:
🔧   project-name: rust-pico-linuxtag ...
🔧   Generating template ...
? 🤷   Which flashing method do you intend to use? ›
❯ probe-rs
  elf2uf2-rs
  custom
  none

✔ 🤷   Which flashing method do you intend to use? · probe-rs
🔧   Moving generated files into: `.../rust-pico-linuxtag`...
🔧   Initializing a fresh Git repository
✨   Done! New project created ..../rust-pico-linuxtag
Code anpassung in src/main.rs
Öffne das Projekt in VSCode: , z.B. via Shell:
code ./rust-pico-linuxtag
Ändere in src/main.rs den LED-Pin:
#![allow(unused)]
fn main() {
    let mut led_pin = pins.gpio15.into_push_pull_output();
}
Und dann starten wir:
cargo run
Debugging
Anpassung der launch.json für das neue Binary
Nun launch.json anpassen, ersetze rp2040-project-template mit rust-pico-linuxtag:
"programBinary": "target/thumbv6m-none-eabi/debug/rust-pico-linuxtag",
Den Namen des Binaries kannst Du auch mittels Shell ermittelt: ls -l target/thumbv6m-none-eabi/debug/
Debugger in VSCode starten mit Ctrl-Shift-D und zum Starten auf den grünen Pfeil klicken.
Projektanalyse
Mit cargo tree werden die Projektabhängigkeiten angezeigt.
Nützliche Links
Hier ein paar nützliche Links für die Arbeit mit dem Pico unter Rust:
- Board Support Package: RP2040 HAL Boards GitHub
- HAL: rp2040-hal auf docs.rs
- Board Support Package: https://github.com/rp-rs/rp-hal-boards/tree/main/boards/rp-pico/examples
- HAL: https://docs.rs/rp2040-hal/latest/rp2040_hal
Um die Repos zu klonen, geh in Repo-Verzeichnis:
git clone https://github.com/rp-rs/rp-hal-boards
git clone https://github.com/rp-rs/rp-hal

# Beispiele sind unter examples zu finden:
ls ./rp-hal-boards/boards/rp-pico/examples
ls ./rp-hal/rp2040-hal/examples
PIO (Programmable Input/Output)
git clone https://github.com/rust-augsburg/rust-pico-examples
cd rust-rasperry-pico-examples/pio-demo
Feedback and Outlook
Questions & Answers
Next Steps
![]() Augsburg Rust Meetup: From loops to folds, leaving the boring C patterns behind. 26.09.2024
Augsburg Rust Meetup: From loops to folds, leaving the boring C patterns behind. 26.09.2024